
Samsung Galaxy J7 Sky Pro has so many features. These how-tos and tutorials will help you to explore and better use your latest device.

All these Samsung Galaxy J7 Sky Pro tutorials include very detailed step-by-step instructions. All tutorials are carefully prepared for all levels of users.
Samsung Galaxy J7 Sky Pro User Manual (TracFone)
Samsung Galaxy J7 Sky Pro user manual provides users with basic information and guides in setting up the phone, also a good reference for anyone not familiar yet with Samsung phone specific features.
Download: Samsung Galaxy J7 Sky Pro User Manual
Removing the Back Cover Samsung Galaxy J7 Sky Pro
Make sure your phone is turned OFF. Remove the back cover by using the slit on the side of your phone.
- When removing the back cover, use the slot next to the Volume key to gently lift the cover off.
- Lift the cover up and to the left of the device.
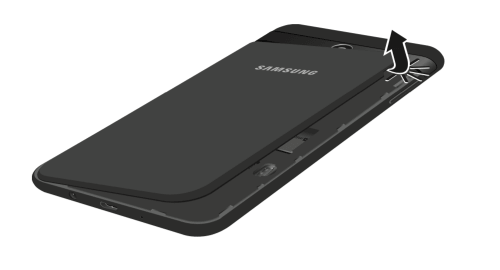
Caution: Pulling on the Speaker (located next to the Power button) may cause damage.
Do not bend or twist the back cover excessively. Using excessive force on the cover during removal or installation of an internal component can cause the material to break.
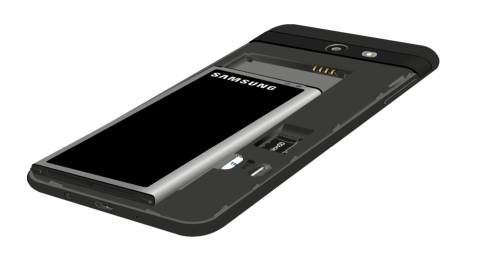
How to Insert Battery in Samsung Galaxy J7 Sky Pro
The following steps describe how to insert a Samsung Galaxy J7 Sky Pro battery:
- Remove the back cover by using the slit on the side of the phone.
- Place the battery into its compartment by inserting the top end first, making sure that the metal pins on your phone are touching the metal bars on the battery. Then, gently push in the bottom end of the battery.
- Place the back cover onto the back of the device and press down.
- Press along the edge of the back cover until you have a secure seal.
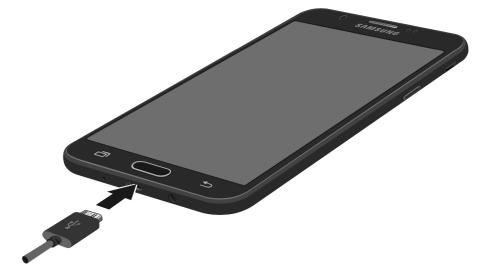
How to Charge the Samsung Galaxy J7 Sky Pro Battery
Your Samsung Galaxy J7 Sky Pro is powered by a rechargeable, standard Li-Ion battery. A USB charger (charging head and USB cable) is included with the device for charging the battery from any standard outlet.
- Insert the USB cable into the charger port at the bottom edge of your phone.
- Connect the USB cable to the charging head, and then plug the charging head into an electrical outlet.
- Unplug the charging head from the outlet and remove the USB cable from the device when charging is complete.
Use only charging devices and batteries approved by Samsung. Samsung accessories are designed for your device to maximize battery life. Using other accessories may void your warranty and may cause damage.
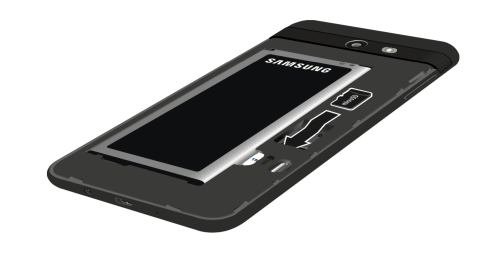
How to Insert SIM Card in Samsung Galaxy J7 Sky Pro
The following steps describe how to insert a SIM card in the Samsung Galaxy J7 Sky Pro:
- Make sure your phone is turned OFF. Remove the back cover by using the slit on the side of your phone.
- Remove the battery by using the space provided at the bottom of the battery compartment and pulling it outward.
- Locate the SIM card holder next to the battery compartment. Arrange the SIM card so that the gold contact on the card faces down.
- Slide the SIM card under the metal fastener until it stops.
- Replace the battery and back cover.

Please be careful when handling the SIM card to avoid damaging it. Keep all SIM cards out of reach of small children.
How to Insert Memory Card in Samsung Galaxy J7 Sky Pro
You can install a microSD or microSDHC memory card (not included) to add more memory space to your device.
- Make sure your phone is turned OFF. Remove the back cover by using the slit on the side of your phone.
- Locate the microSD card holder next to the battery compartment. Arrange the memory card so the gold contact bars on the card face down.
- Slide the microSD card into the holder until it stops.
- Replace the battery and back cover.
A memory card can be installed at any time. It is not necessary to install it prior to using the device.
How to Find Serial Number on Samsung Galaxy J7 Sky Pro
This tutorial will show you how to find serial number on Samsung Galaxy J7 Sky Pro.
- From the main screen, tap the “Apps” icon.
- Tap the “Settings” icon.
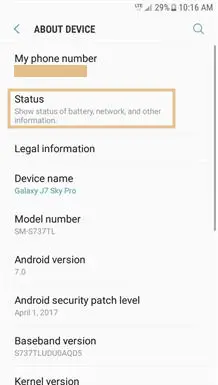
- Slide the screen up to see more options. Then, tap “About device” or “About phone”.
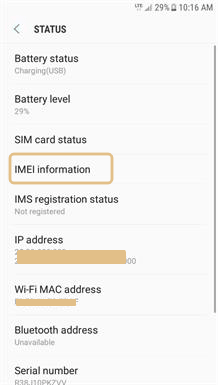
- Tap “Status”.
- Tap “IMEI information”.
- Locate “IMEI”. The number below is your phone’s Serial Number.


Serial Number or IMEI Number is a unique 11, 15, or 18 digit serial number that uniquely identifies a mobile phone.
How to Find SIM Number on Samsung Galaxy J7 Sky Pro
This tutorial will show you how to find SIM number on Samsung Galaxy J7 Sky Pro.
- From the main screen, tap the “Apps” icon.
- Tap the “Settings” icon.
- Slide the screen up to see more options. Then, tap “About device” or “About phone”.
- Tap “Status”.
- Tap “IMEI information”.
- Locate “ICCID”. The number underneath is your SIM card number.

SIM number is technically called the ICCID, which stands for Integrated Circuit Card Identifier. It usually consists of 19 or 20 characters, and is both printed on your SIM card and stored inside it.
How to Find Phone Number on Samsung Galaxy J7 Sky Pro
This tutorial illustrate step by step how to find your TracFone phone number on Samsung Galaxy J7 Sky Pro.
- From the main screen, tap the “Apps” icon.
- Tap the “Settings” icon.
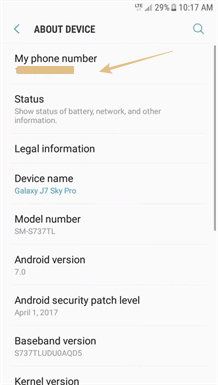
- Slide the screen up to see more options. Then, tap “About device” or “About phone”.
- Locate “My phone number”. The number below is your phone number.
How to Perform Hard Reset the Samsung Galaxy J7 Sky Pro
Step by step instruction on how to hard reset Samsung Galaxy J7 Sky Pro, to bring the phone to its clean state just like when it was fresh out of the factory.
Read: How to Hard Reset Samsung Galaxy J7 Sky Pro
Hopefully the information presented on this page is useful for Samsung Galaxy J7 Sky Pro owners. You can visit this page regularly as this page will be updated and new tutorials will be added.